 |
| Editing the menu tree of an application |
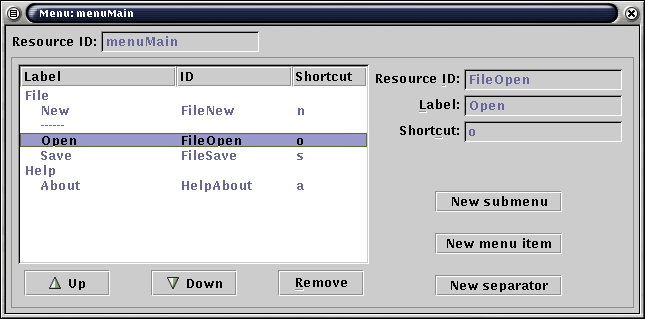
The menu editor is a bit different from the other resource editors, because rather than being a collection of properties, a menu resource stores a tree of sub-menus and menu items.
After you create a menu resource, the first thing you will want to do is populate it with sub-menus. There are no top-level menu items in PalmOS: all menu items must be placed in a sub-menu.
Click the New submenu button to add a sub-menu to the edited menu resource. Subsequent sub-menus are always inserted after the currently selected sub-menu.
Sub-menus are only part of the user interface, they do not emit
events themselves. Thus, sub-menus only have a label
and no associated ID. You can edit the label in the editor area
on the right-hand part of the menu editor window.
Sub-menus can hold an arbitrary number of menu items and separators. Use the New menu item button on the right-hand side of the menu editor to create an item.
A menu item has a label (the caption shown to the user), a resource ID (which is used by the application's event handler to distinguish menu item events) and an optional shortcut. The shortcut is a single letter that, when entered combined with the shortcut (\) character, emits the same event as if the corresponding menu item was tapped. Thus, in the example above, the user entering \a causes the "About" dialog to appear.
Separators are used to group related menu items based on their function. Clicking the New separator button inserts a new separator in the current sub-menu, after the currently selected menu item.
Use the Up and Down buttons to change the order of sub-menus and menu items. Menu items are moved only inside their parent sub-menu. Moving sub-menus moves their children with them.
Sub-menus and menu items can be deleted with the Remove button. Removing a sub-menu deletes all its children as well.
| Previous: Resource Windows | Index | Next: Bitmaps |