There are several ways for starting up Guikachu:
Click on the Guikachu icon in the Development category of the GNOME Panel menu to launch Guikachu with an empty document.
Double-click on an existing Guikachu document in Nautilus to start editing the selected document with Guikachu.
When you start Guikachu from the command line, you can optionally include the name of a file to start working on. If the file does not exist, Guikachu will create it the first time you save your work.
You can also open remote URI's from the command line, as in the following example:
$ guikachu http://company.net/palm-project/ui.guikachu
The last edited file is remembered, and it is automatically loaded when the session manager restarts Guikachu.
Refer to the GNOME documentation on setting up the session manager with GNOME.
Regardless of how you start Guikachu, the application starts with the main window displayed.
To make use of the resources that you've created with Guikachu in your PalmOS application, you will have to compile it into the native machine format of PalmOS. This is not done by Guikachu, instead, it outputs a file in the RCP format that's suitable for PilRC to process. PilRC is a free, portable PalmOS resource compiler.
Besides the Guikachu application exporting projects in RPC, a small utility program called guikachu2rcp is also included. This can be used to create RCP files from Guikachu projects on the command line, or to use automated build systems like the UNIX Make system.
Compiling an RCP file into PalmOS machine code is done as shown in the following example (compiling my-app-1.rcp):
pilrc -H my-app-1.rcp.h my-app-1.rcp
This will create a couple of files with the ".bin" and ".grc" extensions. These will be linked into the main application with the build-rcp tool, part of the PalmOS SDK.
The file "my-app-1.rcp.h" will also be created, which is used to associate the symbolic (textual) names of the resources to the numerical representation used by PalmOS. It contains lines like:
/* pilrc generated file.  Do not edit! */
#define HelpAbout 9973
#define FileSave 9974
#define FileOpen 9975
#define FileDanger 9976
Include this header in your C source files to access the resources from the application code. See the sample code included in the Guikachu source distribution for more information.
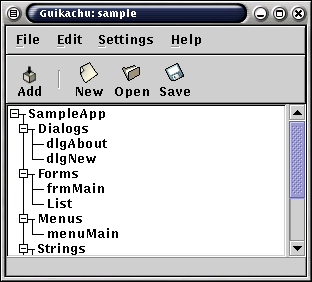
The main window shows the contents of the current project and allows you to do I/O operations and edit/add/remove resources.
 |
| The main window, with the sample file opened |
There are five parts of the main window, from top to bottom: the window title (provided by the window manager), the menu bar, the tool bar, the resource list, and the status bar. The menu bar contains the I/O commands and the tool bar contains shortcuts to common operations. The status bar shows a description of the currently selected menu item.
Resources are stored in XML files. Use the Save and Open commands from the tool bar or the File menu to save the project you're currently working on, or to open a previously saved project. The first time you save your project, a file selector will pop up asking you to enter the name of the newly created file. Although you can use any name you want, it is a good idea to use ".guikachu" as the file extension, to make sure you can open it from the file manager.
Importing of RCP files in an exciting new feature of Guikachu 1.4. Choose "PilRC document" in the File Type dropdown list, and select an RCP file from the file list.
Guikachu remembers the last couple of files opened, and you can quickly access them from the bottom of the File menu.
To create the RCP files for compiling by PilRC, select "Export RCP" from the File menu. You will be asked to enter the name of the RCP file to create.
Use the New command from the File menu or the tool bar to start a new project from scratch.
The main window lists resources in the current project grouped by their type. You can show/hide resources of a given type by clicking on the small plus/minus sign to the left of the category names. Hiding a category does not remove resources of that type from the project, it merely allows you to save space on your desktop.
The Edit menu of the main window contains commands for manipulating the clipboard and using the undo system.
Cut and Copy work like in any other application: they place the selected resource onto the clipboard, and in the case of Cut, also remove it from the current project. You can then use Paste in any other Guikachu window to create a duplicate of this resource and insert it into the project.
Note: Due to the way clipboards in the X Window System work, the contents of the clipboard are lost when you quit Guikachu.
The Edit menu also contains Undo and Redo. Use Undo if you want to revert changing something you didn't intend to. If you then realize that the change was, in fact, desirable, use Redo to apply the change again.
 |
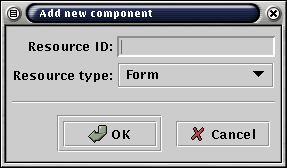
| Adding a new resource |
Click the Add button in the tool bar or the File menu to add a new resource to the project currently opened. Select the resource type from the drop-down menu, and type in the ID of the newly created resource. If you don't enter an ID, Guikachu automatically assigns a new, unique name based on the type of the resource.
Right-click on a resource in the resource listing to pop up a menu of available commands. Cut and Copy work like the respective items in the Edit menu. Click on Remove to delete the selected resource from the current project.
Click on Preferences in the Settings menu to display the dialog box where you can tune certain aspects of Guikachu to your liking.
 |
| The Preferences dialog box |
Currently, there are preference settings only for the Form Editor. You can change the colors used by the form preview by clicking on the colored buttons and selecting a new color. These colors are only used when editing greyscale Palm projects, otherwise true colors are used. The default zoom factor will be used when opening form editor windows, but can be changed individually for each preview window as well.
Click on OK or Apply to make the current settings take effect (OK also closes the window). Click on Close to dismiss the dialog without using the new settings.
| Previous: Introduction | Index | Next: Resource Windows |